How to make Claude Code build Figma button components for you, live on your canvas. No coding experience needed. I literally have none.

I spent 3 days failing at this so you can do it in 30 minutes

A guide for AI noobs, by Seeon Kim


From Claude to Figma via MCP by Nacer Mediouni

Credit: Nacer Mediouni

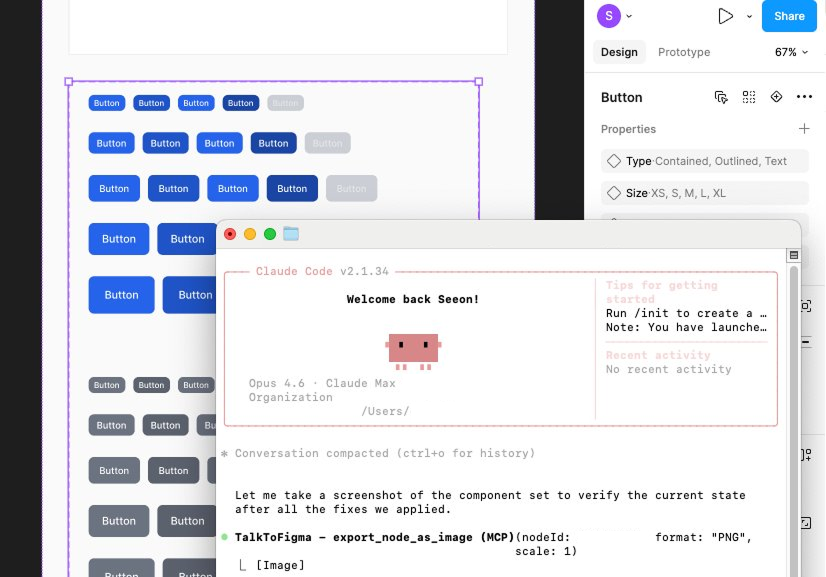
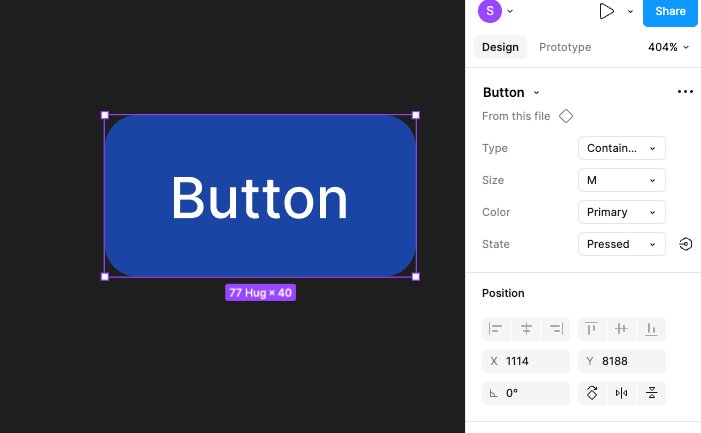
So I saw this Nacer Mediouni post on LinkedIn where he talks to Claude in a terminal window and 450 Figma button variants just start appearing on his canvas. Like magic. I watched it four times. My jaw was on the floor.

Then I thought: "I need to do this."

Here's the thing about me though. I'm a noob. Like, a real one. Coding class dropout. The kind of person who still googles "how to open Terminal on Mac." I have been emotionally damaged by AI chatbots confidently telling me wrong things for three straight days.

I asked ChatGPT to help me set this up. It gave me fake plugin files. I asked Claude Desktop. It sent me in circles. I burned through my token credits. I broke Figma twice. I rage-quit once. I may have cried a little (the room was dusty, ok?).

But after 3 days of pain, confusion, and way too many browser tabs, I finally got it working.

If you have insane vibe-coding FOMO but zero coding skills? I got you. You are not the only noob here. Let's do this together.

Wait, how does this even work?

Don't overthink it. It's four things talking to each other. You set them up once.

Claude CodeYou talk to Claude here
MCP BridgeTranslator for Figma
WebSocketThe "phone line"
Figma PluginMakes stuff appear

What are these things? I didn't know either. Here's the plain English version:

Claude Code is an AI that lives in your Terminal (that black text window). You type "make me a blue button" and it does things.

MCP Bridge is a translator. Claude speaks "AI language," Figma speaks "design language." This translates between them.

WebSocket is a phone call between Claude and Figma that stays open the whole time.

Figma Plugin is a tiny add-on inside Figma that picks up the phone and does what Claude says.

⚠️ Thing that confused me for 2 days: Claude Code ≠ Claude Desktop.

Claude Desktop = the cute chat app with a nice window. The one you probably use already. That's NOT what we need.

Claude Code = a totally different tool that runs in Terminal. It looks like a hacker movie. But it's literally just text. This is what Nacer uses in his video.

Claude Code creating button components in Figma
Progress
0 / 16

Alright, let's start. 🤝

Before we go any further, you'll need:

💳Paid Claude account (Pro, Team, or API credits). Free tier won't cut it.
🎨Figma with a paid plan (Pro or higher). You need the desktop app, not the browser version.
🍎A Mac. This guide is macOS only. I don't speak Windows, sorry.
🍿Popcorn. You'll be watching AI do your work for 1-2 hours. Might as well enjoy the show.
Step 0: The boring stuff

If you already have Node.js, Bun, and Git installed — skip to Step 1. If those words mean nothing to you, you're in the right place. No shame. Let's do this.

1
Tip: Click each step's circle to mark it complete. Your progress is saved.
Open Terminal
It's just a text window. It can't hurt you. Probably.
1.Press Cmd + Space (opens Spotlight search)
2.Type Terminal
3.Press Enter — a window appears with a blinking cursor. That's it. That's Terminal.
💡Everything in this guide = copy a command, paste it into this window (Cmd+V), press Enter. If you can copy-paste, you can do this.
Install Node.js
An engine that makes Claude Code work. Install once, forget forever.

Check if you already have it:

Paste into Terminal, press Enternode --version

See a number like v20.11.0? Skip ahead.

See command not found? No worries:

1.Go to nodejs.org
2.Click the green LTS button (means "the stable one")
3.Open the download → click through the installer
4.Close Terminal and reopen it
5.Run node --version again. Should show a number
Install Bun
Like Node.js but faster. The Figma bridge needs it.
💡What's Bun? A tool that runs JavaScript code — same idea as Node.js, just faster. The Figma bridge was built with it. Install once, never think about it again.

Check if you already have it:

Number? Skip. command not found?

Install Buncurl -fsSL https://bun.sh/install | bash

Then activate it:

Activatesource ~/.zshrc
Install Git
How you download code projects.
Checkgit --version

If your Mac asks to install "Command Line Developer Tools" → click Install. Wait a few minutes. Grab coffee.

Make sure you have Figma Desktop
The app, not the website.

The plugin only works in the desktop app. Download at figma.com/downloads.


Step 1: Install Claude Code
Install Claude Code
The AI brain that talks to Figma for you.
Paste into Terminalnpm install -g @anthropic-ai/claude-code

Then check:

Verifyclaude --version
💸Claude Code requires a paid plan. Pro, Team, or API credits. The only part that costs money.
Log in for the first time
Claude needs to know who you are.
Run thisclaude

It opens a browser. Log in. Once connected, type /exit to close for now.


Step 2: Install the Figma bridge

What's a "bridge"? Claude doesn't speak Figma. This is the bilingual friend in the middle. Someone built it for us (thank you Sonny Lazuardi 🙏). We just download it.

Download the bridge
Copy-paste the whole block.
Paste this entire thingcd ~ git clone https://github.com/sonnylazuardi/cursor-talk-to-figma-mcp.git cd cursor-talk-to-figma-mcp bun install

Wait ~30 seconds for it to install.

Start the bridge server
Opens the "phone line."
Same Terminalbun socket

Should say: WebSocket server running on port 3055

🚨DO NOT CLOSE THIS TERMINAL. Minimize it. Closing it = everything breaks.
😤Got a "SSL_KEY_PATH" or TLS error? I got this too. Run this instead:
TLS fixcd ~/cursor-talk-to-figma-mcp && sed -i '' '/tls: {/,/},/d' src/socket.ts && bun run src/socket.ts

Step 3: Set up the Figma plugin

Good news: The bridge already has a working plugin inside it. No need to build your own (I tried... it did not go well). We just point Figma to it.

Import the plugin into Figma
Tell Figma where the plugin files live.
1.Open Figma Desktop → open any file
2.Menu (☰) → Plugins → Development → Import plugin from manifest...
3.Press Cmd + Shift + G in the file picker
4.Paste: ~/cursor-talk-to-figma-mcp/src/cursor_mcp_plugin → Enter
5.Click manifest.json → Open
🚫Biggest trap: Two manifest.json files exist. Use the one inside src/cursor_mcp_plugin/ — NOT the root folder. Ask me how I know. 😭
Run the plugin and copy the Channel ID
The moment of truth.
1.Menu (☰) → Plugins → Development → click the plugin
2.A window shows "Connected" ● (scream internally)
3.Copy the Channel ID (random letters like nvimbd2w)
🚨Keep this window OPEN. Close it = connection breaks.

Step 4: Connect Claude to Figma
Tell Claude Code about the bridge
One-time setup. Claude remembers after this.

Open a new Terminal window (Cmd+N). Don't close the other one.

Paste into the new Terminalclaude mcp add --transport stdio TalkToFigma bunx cursor-talk-to-figma-mcp@latest
Start Claude and join the channel
THIS IS IT.
Start Claude Codeclaude

When ready, type this. Replace the ID with yours from Step 10:

Connect to FigmaTalk to Figma, join channel YOUR-CHANNEL-ID-HERE

If Claude says "Successfully joined"? congratulations. You legend.

🥳You're connected. Claude and Figma can talk.

Step 5: Build your buttons
Quick test first
One rectangle before 450 variants.
Type in Claude CodeCreate a blue rectangle in Figma, 200px wide and 100px tall

Blue rectangle on your canvas? IT WORKS. Delete it. Deep breath.

Build the full button system
Paste the spec. Watch the magic.
Paste all of this into Claude CodeCreate a complete Button component system in Figma with these specs: STYLES (3): Contained (solid fill), Outlined (border only, transparent fill), Text (no fill, no border) COLORS (6): - Primary: #2563EB (blue) - Secondary: #6B7280 (gray) - Error: #DC2626 (red) - Warning: #F59E0B (amber) - Info: #3B82F6 (light blue) - Success: #16A34A (green) SIZES (5): - XS: height 24, padding 4/8, font 12px - S: height 32, padding 8/12, font 14px - M: height 40, padding 12/16, font 14px - L: height 48, padding 12/20, font 16px - XL: height 56, padding 16/24, font 16px STATES (5): Enabled, Hovered (slightly darker), Focused (with focus ring), Pressed (even darker), Disabled (grayed out, 50% opacity) STRUCTURE: - Use auto-layout (horizontal) for each button - Center-aligned text, label "Button" - Border radius: 8px, Font: Inter Medium weight - Name: Style=Contained, Size=M, Color=Primary, State=Enabled Organize in a grid inside a frame called "Button Documentation". Create each variant one at a time.

Sit back and watch. 🍿

⏱️This can take 1–2 hours. Depends on how fancy your Mac is. M1/M2 Pro? Maybe faster. Old Intel MacBook? Go take a nap. Seriously, go do something else. It's working, just slowly.
⚠️Figma will lag. Don't force-quit. It recovers.

Step 6: Turn them into real components (manual step)

Why is this manual? As far as I know (and Claude Code confirmed this), the plugin can create frames, rectangles, text, colors, auto-layout... but it can't create component sets or Figma variables. That part is on you. But don't worry, it takes like 2 minutes and it's actually satisfying.

Select all buttons and create a component set
This is where Claude's naming convention pays off big time.

Here's the key thing: Claude Code named every button like Style=Contained, Size=M, Color=Primary, State=Enabled. That naming format is exactly what Figma uses for variants. So when you create a component set, Figma automatically turns them into proper components with variant properties. Magic.

Here's how:

1.Press Cmd + A to select all the buttons Claude created
2.Important: Make sure you're selecting the individual buttons, not the parent frame. If you selected the frame, double-click into it first, then Cmd+A.
3.Right-click (or click the menu in the right panel)
4.Click "Create component set"
🎉Boom. Figma reads the naming convention and automatically creates variant properties: Style, Size, Color, State. You now have a real, swappable, production-ready component set. All because Claude named things properly.
Button component with variant properties in Figma
💡Not working? You probably selected the outer frame instead of the individual buttons inside it. Click into the frame first (double-click), then Cmd+A to select just the buttons, then create component set.
🎉

You actually did it!

Congrats, you are now a tiny bit advanced vibe-coding designer. Just like me.

We went from "what is Terminal" to "AI builds my Figma components."

That's growth. That's character development. That's main character energy.

Welcome to the club.


Cheat sheet

Every session after setup

All that setup was one-time. From now on, it's just these 4 steps:

🔑3 things stay open: server Terminal, Figma plugin, Claude Code. I close the wrong one approximately once per session.

Pro tip: when you get stuck

Got an error? Something not working? Copy whatever Claude Code is showing you in the Terminal and paste it into Claude Desktop (the chat app) to troubleshoot. I tried comparing between ChatGPT and Claude for debugging this stuff, but honestly, Claude tends to spot the error faster and gives better solutions for this project. Not saying she's superior to Chat or anything... it's just, we've been talking to her more than Chat for this particular project, so she has better context. She gets us.

Pro tip #2: type commands in the right window

Want Claude to make changes to your buttons? Type your commands in Terminal 2 (the one running Claude Code). NOT Terminal 1. Terminal 1 is the socket server. It just sits there doing its thing. Don't type in it. Don't even look at it. Leave it alone. All your "hey Claude, make this button blue" conversations happen in Terminal 2. I mixed these up more times than I'd like to admit.


Stuff that went wrong for me

A brief and humiliating recap of my 3-day journey, so you don't repeat my mistakes.

🤡 "command not found: bun"

I spent 15 minutes convinced Bun didn't install. Turns out my Terminal just needed a refresh. One source ~/.zshrc and it worked.

🤡 "command not found: claude"

Installed Claude Code. Typed claude. Nothing. Panicked. Googled for 20 minutes. The fix? Close Terminal. Open Terminal again. That's it.

🤡 The SSL/TLS error that made me question my life choices

Ran bun socket, got a terrifying wall of red text about SSL certificates. I thought I broke something deep inside my Mac. Nope. The server just had HTTPS enabled by default and I didn't have the certificates. The sed fix in Step 2 removes it in one line.

🤡 Imported the wrong manifest.json (twice)

There are TWO manifest files in the project. I imported the root one. Got a weird error. Deleted it. Imported the root one again because I forgot which one was wrong. Got the same error. Had a conversation with myself. Then found the right one in src/cursor_mcp_plugin/.

🤡 "Nothing is happening in Figma"

Everything was connected. Claude said it joined the channel. I gave it a command. Nothing. Stared at my screen for 5 minutes. Turns out I accidentally closed the Figma plugin window. You need THREE things open at the same time: server Terminal, plugin window, and Claude Code. I close the wrong one at least once per session.


Want to do it all over again?

Re-start

What's next

So here's where my brain is at right now. I've been practicing creating JSON style guides for things like primitive colors, semantic color tokens, typography scales, padding, spacing... all through Claude Code. Then importing those into Figma through Tokens Studio.

And now I'm curious. What happens when you combine this plugin with a design system that already has tokens imported? Like, can I tell Claude "make me a button" and have it actually use my existing design tokens instead of hardcoded hex values? Can it read what's already in my Figma file and build on top of it?

I don't know yet. But I'm going to find out.

Stay tuned for my next noob failure reflection. 🫡


Credits: Nacer Mediouni for the original demo. Sonny Lazuardi for building the bridge. Anthropic for Claude Code. And Claude. I wanted to be nice to her, but I was running out of credits lol.